
Recipe for salt dough. Salted dough for crafts: recipe. Colored dough with cream of tartar

The basic “working recipe” for simple crafts:
For 1 cup of flour, take half a glass of salt and half a glass of water. At the same time, we take the same number of grams of flour and salt by weight, but the flour is larger in volume, which is why it comes out to half a glass of salt per glass of flour.
Salt dough recipe for thin parts:
To the basic working recipe, add a tablespoon of starch, or wallpaper glue, or PVA glue, and the wallpaper glue must first be diluted with water in a standard proportion.

Recipe for strong salt dough for large crafts:
A glass of flour, a glass of salt, half a glass of water.
Dough recipe for thin parts:
One and a half glasses of flour, half a glass of salt, 4 tablespoons of glycerin, sold in pharmacies, 2 tablespoons of wallpaper glue (previously diluted with water). The best way to mix the mass is with a mixer - it’s both quick and the composition is successful.

How to get colored dough:
Salt dough can be perfectly tinted with watercolors, food coloring, and gouache. If you add cocoa, you can get a gorgeous chocolate color. Please note that when the product dries, the color will become slightly lighter and less bright, so be sure to varnish the product after drying - the color will become brighter and more saturated.
How to knead flour
You cannot take flour with additives - baking powder and yeast, so be sure to read the ingredients! Just plain flour, otherwise it will turn out to be a cake? It will rise and there will be a bun.
Take fine salt, extra salt. The grains quickly dissolve and fit perfectly into the flour. Rock salt does not dissolve well and may produce grains. First, mix the salt and flour, and then add water!
Store the kneaded dough in a plastic bag so that there is no access to air. In the air, the dough becomes crusty, but this should not be allowed. You should also remove the play dough from the bag in parts in order to work with fresh material.
Tools for working with salt dough
A rolling pin is for rolling out the dough, a knife is for cutting off the required pieces of dough, a comb is good for making relief patterns, a gel pen refill is convenient for squeezing out holes in the dough.

Stamps can be made from anything you can get your hands on. For example, some buttons, burlap, molds from children's sets for playing in the sand, handles of forks and knives from sets. The scope for creativity is limited only by your imagination and the availability of things in the house.
How to properly dry salt dough crafts
1 Set the oven to the lowest temperature.
2 if the temperature is not regulated, then reduce the heat to a minimum and open the oven door slightly (for gas stoves)
3 Place the product in a cold oven; heating should occur gradually, without sudden changes. In the same way, the product should cool inside the oven after it is turned off.
4 Some masters recommend drying in stages, taking breaks between drying. It is believed that this will make the product stronger. For example, it dries in the oven for an hour, dries on its own for a day, then we turn on the oven again and dry it for another hour, then it dries again for a day at room temperature.
5 The time required to dry a particular product depends on the mass of flour and the size of the craft.
Painting and varnishing
You can take any paints, acrylic, watercolor, gouache, whatever is closest to you, use it. It is best to coat the paint on top with acrylic varnish, but water-based construction varnish for wooden surfaces will also work.

If the product is swollen or cracked
If it's swollen, that means the wrong flour was taken. The best option is flour without any additives. For better adhesion of flour, you can add rye flour to wheat flour, in a ratio of 1 to 1, or 50 grams of starch, this will give the dough the necessary plasticity. You can also add a tablespoon of PVA construction glue to the dough.

If it's cracked, which means the abalone process was not carried out according to technology. Ideally, it is best if the product dries at room temperature, on its own, without any ovens. But in this case, the drying time can be more than a week. We don’t want to wait, so we can dry it at a minimum temperature in the oven, if it’s electric. Or with the door ajar, on minimum gas, if it is gas. At the same time, it is also important to turn the product over so that it dries evenly. Every hour and a half you need to turn the dough craft over during the drying process, otherwise it may crack.
The craft should be painted after it has completely dried., otherwise the paint may also crack due to the movement of the dough, which is not completely dried.
If something falls off, then glue it with PVA construction glue. Holds up perfectly!
These are all the basic secrets of kneading salt dough. for crafts. Otherwise, experience will come with each subsequent product. Create and delight the world with your handmade products!
Idea - salt dough candlestick

For a very long time I lost sight of such needlework as modeling from salt dough. And this despite the fact that I was always interested in both ceramics and polymer clay (plastic), but I avoided salt dough. Then somehow information came from different sides and I even tried to sculpt myself. I liked it, the only thing that bothered me was that the finished product cannot be dried instantly. However, salt dough provided a lot of opportunities for making various interior items - not only decorative, but also utilitarian.
If you like to create products for the home and interior, then you should definitely try making crafts from salt dough too! For example, you can use it to make a candlestick like this for a tea candle, or you can add something of your own to the design of the candlestick - painting or decoration.
Salt dough infographic for beginners

Salt dough is simply a unique material for those who love to sculpt. You can use it to make many beautiful things for your home: candlesticks, panels, souvenirs, everyday items. You may find it difficult to make ceramics from clay, but salt dough is much easier to work with!

Crafts made from salt dough - frog

For lovers of modeling from salt dough: a very good master class from Svetlana Kanochkina.
So, how to make such a cute frog (looks like ceramic). I really want to learn this sculpting technique. So far I have only made a candlestick and a fish, and even then, the tail of the fish fell off during the drying process.

We form the torso.

We pay attention to details.

The frog is still in “disassembled” form.

We glue all parts of the craft with water mixed with PVA glue.

The porous skin can be formed with a toothpick.

We made such a beautiful frog craft made from salt dough. You can do it together with your child.
I have already written several times about how important a baby is. Yes, I think you know this very well even without me. Therefore, today, without further ado, I want to talk about another exciting and very useful activity - about modeling with kids and how you can play if you have a piece of dough on hand. All these games are useful not only for the development of fine motor skills, but also for the development of the child’s imagination, thinking, and perseverance.
Often mothers ask the question: “What is better to choose for activities with the baby: dough or plasticine?” In my opinion, it would be better if you give your child the opportunity to get acquainted with different substances and sensations, and conduct classes with both dough and plasticine. But here for little ones (from 1 year old) it is better to use dough in modeling classes and that's why:
The dough is much softer and more pliable than plasticine, and for babies who still find it difficult to knead plasticine, this is important.
Considering the fact that many kids will want to taste the modeling mass, dough (homemade) is much safer from this point of view, since its main components are flour, salt and water, and plasticine is still a combination of chemical components.
You can make the dough yourself, or you can buy it in a store (for example, Play Doh). But if you even once knead the dough at home, then, for sure, you will no longer want to deal with store-bought dough. Homemade dough is more flexible, softer, more pleasant, and there is also a lot of it! In addition, the process of preparing the dough is quite simple and does not take much time.
So how do you make play dough? I will give two dough recipes that I have tested several times and I really like. The first recipe can be called a classic salt dough recipe. The dough is prepared very quickly and easily; it is often used to create durable crafts; after drying, it can be painted.
Salted play dough - classic recipe
1 cup flour
½ cup salt (preferably “extra”)
½ glass of water
1 tbsp. vegetable oil
Mix all ingredients and knead thoroughly until smooth.
Recipe for very flexible dough
And another recipe for a very, very soft, plastic, homogeneous and, I would even say, ideal dough! :) It is not suitable for drying and painting, but for fun games with dough it is perfect.

1 cup flour
1 glass of water
¼ cup salt
1 tbsp. vegetable oil
2 tsp citric acid
Combine all ingredients in a saucepan, stir, then place over medium heat. After this, we begin to actively stir the dough with a spoon until it forms a ball and stops sticking to your hands. You will need to stir for no more than 3 minutes. After the dough has cooled, you can start playing with it.
Don't neglect such a seemingly insignificant ingredient as citric acid! If you do not add it, then after storing in the refrigerator the dough will begin to stick to your hands.
You can add food coloring to any version of the dough. If you don’t have a dye to tint the dough, you can use beet or carrot juice, turmeric, brilliant green, and gouache. Well, if you divide the dough into several parts and paint them in different colors, it will be even more interesting!
Both doughs can be stored in the refrigerator in a closed container for quite a long time (several weeks).
Games with dough
So, you have the dough, what to do with it next? First of all, of course, you need to introduce the baby to the test. Give him the opportunity to touch and knead him. You can make some kind of bun or bunny to show what the dough is capable of. If the acquaintance went well, you can move on to games.
Remember that the entire lesson should not last longer than 5-10 minutes. Do not try to include all the games in one lesson, watch your baby and always stop before he gets tired of the activity. If your baby is losing interest in a particular game, it may be too easy or too difficult for him. Try to simplify or make the task easier.
1. Roll out the dough with a rolling pin
The baby will most likely be happy to start rolling out the dough, because he has seen his mother do it more than once. If your baby is having trouble using a rolling pin, help him by clasping his hands with yours.
Both a toy and a real kitchen rolling pin are suitable for the game. My daughter likes rolling with a large rolling pin even more.

2. Press various objects into the dough
Next, you can announce that the resulting flatbread is not just a flatbread, but a pizza or a cake that now needs to be decorated. And for this purpose you can use a variety of objects: matches, pasta, beans, counting sticks, small toys, lids, etc. Try to use objects of different shapes and sizes to diversify the child’s tactile sensations.

3. Create simple crafts based on pressing objects into dough
Let me give you a few examples:
- Hedgehog
 For the little ones, toothpicks can be replaced with matches or counting sticks.

- little man

Be sure to involve your child in rolling out the torso and head. If your baby is not doing well yet, take his hands in yours and make rotational movements together.
4. Pinch off small pieces of dough and place them in a jar/bowl
This activity is very useful for the development of fine motor skills, as it trains the “pinch” grip. It’s quite simple to play around with the activity: invite your child to feed his favorite bear with candy. The game will most likely appeal to the youngest children - children about one year old. At this age, kids really like to tinker with small objects, fold and rearrange them.

5. Prick the dough with a fork.
Try sticking the same candies that you made for the bear onto a fork. You can tell your child that the bear prefers to eat only with a fork, but refuses to eat otherwise. So in the game we will quietly practice a very useful skill.

6. Cut with a knife
The main thing in this lesson is to teach the child to hold the knife correctly and, importantly, to independently hold the dough with his left hand (if the child is right-handed). A toy plastic knife, a special plastic dough knife, or a butter knife work well for the game. The activity will be interesting for babies from about 1 year 3 months.

7. Leave fingerprints on the dough
We press the toy into the dough, carefully remove it and ale-op, you get a beautiful pattern on the dough! Taisiya was simply delighted with this activity, and could get carried away for a long time, imprinting pasta on the dough.
Good for printing sorter figures, pasta tubes, small toys, construction set parts, fork, comb . Well, if according to the test, a car passes by, leaving marks (preferably with large wheels and treads on them), then the baby will most likely appreciate it.

And, of course, it’s worth mentioning the cookie cutters separately. With their help you can not only make beautiful prints. With older kids, you can try removing the “extra” dough around the molds so that you get “cookies”.

Prints can also be made simply with your finger. After which it will be very interesting to “sow” seeds into the resulting holes. This will be another great exercise for developing a “pincer” grip.

8. Pass the dough through a garlic press

9. Put the dough into a mold - make a pie
You can use either muffin tins or clean tins from the shortbread set for this game. When putting the dough into the mold, we try to compact each piece thoroughly. Most likely, you will have to get the cake out of the mold with your mother’s help, because... this is not an easy task.

10. Hide surprises in the dough and find them
This is our favorite game. I think all children love it when there is a surprise moment in the game. They are ready to open intricate locks, unscrew stubborn lids, just to see what is hidden behind them. Children are happy to find surprises, even if they hid them themselves!
Therefore, in this lesson, first, together with the baby, we hide the toy in the dough, placing it on one half of the cake and covering the other. Older kids can be asked to pinch the edges, as when sculpting a pie. Mom can do this for younger children. Well, then we ask ourselves the question “Where is our hedgehog?” or “Oh, who’s hiding here?” Perhaps during the first games the baby will have to be shown how to “get to” the toy. Most likely, the baby will catch everything very quickly and will subsequently eagerly pick apart the dough himself.

Even such a seemingly simple activity is incredibly useful for children’s fingers.
11. With mom’s help, sculpt sausages, koloboks and simple figures.

That's all for me, I wish you pleasant games together and more happy smiles on your baby's face! I would be very grateful if you share this article with your friends on social networks (there are special buttons for this at the bottom of the article). Well, in order not to miss new articles, subscribe to updates in Instagram,
You can make a huge number of crafts from salt dough, for example: flowers, animals, various figures, inscriptions, numbers, toys, paintings and whatever you want! Modeling from salt dough is called bioceramics. The advantage of salt dough is that it is convenient to work with, this material is absolutely harmless and crafts made from it will delight you for several years. In this article we will look at how to make crafts from salt dough with your own hands.
You will need: a glass of wheat flour, a glass of extra salt, half a glass of cold water, a bowl.
Recipe

The finished salted dough should not stick to your hands or crumble. It should be cool and easy to sculpt. I recommend watching the video master class!
There are two most common ways to dry salt dough. The first method: the finished craft will dry on its own. The main thing is that it should not be exposed to direct sunlight, otherwise it will crack. The craft can be placed on a flat surface and wait a few days. Second method: dry the finished craft in the oven for 3 to 6 hours (depending on the size of the craft). Drying occurs in batches with breaks. One approach is 1-2 hours. For quick drying in one go, set the oven to 75-100 degrees, and then the craft will dry in an hour. At a temperature of 120 degrees, the craft will dry in 30 minutes, but it is better to dry it naturally.
There are two most common ways to color salt dough. The first method: after drying, paint the finished craft with acrylic paints or gouache using a brush. Second method: food coloring is diluted in water, then added while preparing the dough. When the craft is completely painted and dried, it must be coated with transparent manicure or furniture varnish in 2-3 layers. Each layer must dry before applying the next. This way the craft will last for a long time.
You will need: colored salt dough, stack, clear manicure polish, toothpick.
Master Class

The salt dough star is ready!
Salt dough caterpillar
You will need: colored dough, knife, pva glue, toothpick, pendant, clear manicure polish.
Master Class
- Roll out the sausage.
- Cut it into 6 equal parts.
- Roll into balls.
- Glue 5 balls together.
- Glue the head.
- Make a nose and eyes, then glue them on.
- Poke a toothpick into the hanging area.
- Dry the craft.
- Attach the pendant.
The salt dough caterpillar is ready!
Salted dough apple
You will need:
Master Class
- Make half an apple, make the inside flat, pressing it onto a flat surface.
- Make a thin flat center and glue it to the main part.
- Roll 6 seeds and a stick, then glue to the apple.
- Blind the leaves, then glue them.
- Dry the craft.
- Apply varnish and wait until completely dry.
The salted dough apple is ready!
Salt dough elephant
You will need: colored salt dough, pva glue, clear manicure polish.
Master Class
- Make the elephant's body by rolling an elongated ball.
- Make 4 legs in the shape of plump sausages.
- Make a proboscis.
- Make the elephant's ears in this way: roll out 2 flat cakes, glue flat cakes of the same shape of a smaller size and a different color to them.
- Make a small ponytail.
- Blind your eyes.
- Assemble the elephant in the following sequence: glue the legs to the body, then glue the proboscis, then the ears, eyes and tail.
- Dry the craft.
- Apply varnish and wait until completely dry.
The salt dough elephant is ready!
You will need: salt dough, foil, a candy bowl or similar plastic container, gouache, a brush, clear manicure polish, a modeling board, a knife or a stack.
Master Class

You will need: salt dough, nail scissors, PVA glue, acrylic paints or gouache, manicure brush.
Master Class
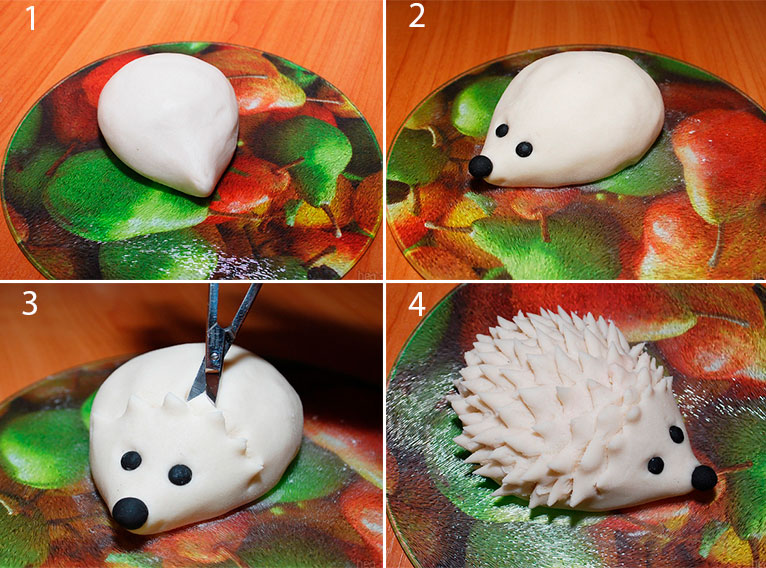
Salt dough hedgehog is ready!
Owl (eagle owl) made from salt dough
You will need: salt dough, pva glue, nail file, manicure scissors, acrylic paints or gouache, brush, wooden board with a pendant, clear manicure varnish.
Master Class

The salt dough owl is ready!
You will need: salted dough, the base on which the craft will be attached, for example, a board or plate, a glass or a knife, a sheet of paper, a simple pencil, a garlic press, a rolling pin, pva glue, acrylic paints or gouache, a brush, clear manicure polish, cloves.
Master Class

Salted dough fruit basket is ready! I recommend watching the video master class!
You will need: salt dough, knife, rolling pin, simple pencil, sheet of paper, sandpaper, acrylic paints or gouache, brush, transparent manicure varnish, glue gun or pva, base for crafts, for example: a board with a frame, transparent manicure varnish.
Master Class
- Draw a cat or print a template.

- Roll out the dough into a thin layer.
- Attach the template and cut out the cat.

- Dry the craft.
- Sand the craft with sandpaper, removing any unevenness.
- Using a simple pencil, transfer the desired design onto the cat’s body.
- Paint with paints and wait until completely dry.

- Glue the cat onto the base with the frame.
Salt dough pencil
You will need: water, flour, extra salt, cardboard jar for the frame, PVA glue, scissors, a piece of decorative rope or corrugated paper, gouache, brush, button, stacks, acrylic varnish for crafts, toothbrush.
Master Class
- Knead the salted dough in this way: add a glass of flour, a glass of salt, add water, then knead until the desired consistency of the dough. Separate part of the dough, add beige gouache, then knead.
- Roll out the cake to a thickness of 10-15 mm.

- Apply PVA glue to the outer rim of the jar and wrap it with dough. Cut off the excess with a stack and smooth the joints with a damp brush.
- Create a small dotted texture with a toothbrush on the surface of the dough.
- Knead the brown dough, roll it into a flat cake 10-15mm thick.

- Cut a 5cm wide strip of brown pastry and glue it to the bottom of the jar.
- Make 2 large owl eye bases from white dough, then glue them on.
- Make a beak out of brown dough and glue it on.
- Make eyes from turquoise dough and glue them on.
- Roll out 8 strips of pink dough, twist them into 4 flagella and make a bow, then leave it to dry for 2 hours.
- Make droplet-shaped owl wings using brown dough, then glue them on.

- Weave ropes of beige dough and glue them onto the neck of the jar.
- Roll out a sausage from white dough, draw the texture of the lace with a stack and glue it as a collar under the beak.
- Place the craft in a warm place for a day.
- Paint the bottom and wings with brown gouache and decorate with white dots.

- Draw the pupils and eyelashes with black gouache, wait until the paint dries, then paint white highlights on the eyes.
- Glue a pink bow above the wing.
- Glue a button with a bow from a corrugated strip onto the lace.
- Cover the craft with varnish and wait until it dries completely.
The salt dough pencil is ready!
Salt dough dachshund
You will need: salt dough, simple pencil, scissors, cardboard, paints, brush, rope, toothpick, foam sponge, clear varnish, PVA glue.
Master Class
- Draw a dachshund on the cardboard as shown in the image.
- Cut out the template.

- Roll out the dough to a thickness of 5 mm and cut out the dachshund according to the template.
- Roll out the oblong eyes, then glue them on.
- Blind the eyelids and glue them onto the eyes.
- Use a toothpick to outline the paws, nose, mouth, ear and body contours.

- Roll out an oval, then glue it onto the ear and smooth the seam with a wet finger. Use the same method to add volume to the dachshund's back and tail.
- Mark stripes in different directions around the entire perimeter of the dachshund, so that the stripes resemble wool.
- Dry the figurine.

- Glue a piece of rope to the back of the craft for further hanging.
The salt dough dachshund is ready!
Boletus mushroom made from salt dough
You will need: salt dough, light bulb, paints, brush, foil, cardboard, masking tape, superglue, PVA glue, paper napkins, clear varnish, stack.
Master Class
- Cover the light bulb with tape, then cover it with dough and dry the workpiece.
- Cut a ring out of cardboard and place it on the light bulb as a base for the hat.
- Form a hat from crumpled napkins, then secure with tape.

- Wrap the hat with foil.
- Roll out the dough to a thickness of 5 mm and stick around the cap.
- Remove the cap from the stem, cover the bottom with dough and make stripes in a stack.
- Glue the hat onto the leg.

- Mold the mushroom's arms, legs and nose, then glue them on PVA.
- Make a caterpillar and glue it to the hat.
- Dry the figurine.

- Paint the figurine, then leave to dry.
- Cover the craft with varnish and wait until it dries.
Boletus mushroom made from salt dough is ready! I recommend watching this video!
Funny salt dough pigs
You will need: salt dough, paints, brush, foam sponge, stack, thin rope, toothpick, black gel pen, PVA glue.
Master Class
- Roll 2 balls for the snout and use a toothpick to make the nostrils.
- Make a muzzle, glue a snout and eyes above it.
- Make triangular ears, glue them, then mark stripes with a stack at the junction of the ears and head.

- Make a heart and glue it to the bottom side.
- Make indentations along the edge of the entire circle.
- Using a toothpick, make 2 holes on the top for attaching the rope and 2 holes on the bottom for the legs.

- Roll up the arms and glue them in such a way that they hold the heart.
- Make the hooves and make holes in them for the rope.
- Dry the workpieces.
- Paint the blanks with black paint and let them dry.
- Wash off the paint from the convex parts of the workpiece under running water with a sponge and wait until it dries.

- Prime the figures with a sponge and white paint.
- Color the piglets.
- Draw small details with a black gel pen.
- Cover the craft with varnish and wait until it dries.

- Glue wool threads as hair.
- Make a pendant out of rope.
Funny salt dough pigs are ready! I recommend watching this video!
Many needlewomen who are fond of modeling, or mothers whose young children have chosen this hobby, have tried many materials. Interesting figures, jewelry, paintings are created using clay, plasticine, plastic (polymer clay). Another original and environmentally friendly material that every woman can create with her own hands is salt dough. With its help, amazingly beautiful products are obtained. But few people know how to make salt dough correctly. Below you will learn some good, proven recipes.
Salted dough for modeling at home
Salt dough is a material that has gained wide popularity among needlewomen. It is often used for modeling with small children, because, unlike plasticine, which contains substances that are not very beneficial for a child’s skin, such dough is safe. And if there is no glue in the composition, nothing bad will happen if the baby swallows a piece while making crafts. Several advantages of salt dough over other materials:
- Does not require serious financial investments. As a rule, the necessary ingredients for cooking are always at hand.
- It is quickly washed off your hands and leaves no marks on clothes or surfaces.
- It has good density properties, holds its shape, and does not stick to your hands during sculpting (if it is mixed well and correctly).
- Subsequent drying of finished products can be carried out both in the oven and in air.
- Many substances are suitable for coloring the resulting crafts, including natural dyes.
- If you coat the finished products with varnish, they will be preserved for a long time.
Modeling is a great activity that will bring a lot of fun to both adults and young children. In children, this hobby will help develop fine motor skills and contribute to the development of the ability to concentrate, which is especially important in the preschool period. Finished products can be given to close friends and relatives as gifts for the holidays, paintings made from salt dough will decorate the house, and toys will be an excellent reminder of the child’s tender age. In addition, joint modeling will bring parents and children closer, which is also an undeniable advantage of this activity.
Required Ingredients
Preparing salt dough is a process that requires care, especially for those who are making such a mixture for the first time. However, the number of ingredients is small and many of them can be found in every housewife’s kitchen. The basis of any version of the dough is salt and wheat flour, which are kneaded with water. Some people prepare a mixture of wheat and rye flour to make the material easier to process. To make the dough more elastic and thick, needlewomen can use the following additional ingredients:
- Dry wallpaper glue. This component will help make future products more durable.
- Vegetable oil or regular hand cream will give the salt dough plasticity, making it easier to sculpt.
- Kissel made from potato starch. This ingredient can be used instead of water to make the dough pliable. How to prepare: Dissolve a teaspoon of potato starch in half a glass of water. Mix with a glass of freshly boiled water. Put the liquid on the fire, keep it until the mass becomes thick - the water substitute is ready.
- Food and other dyes to create colored dough.
DIY dough making tools
To make salt dough, you will need a wide mixing bowl and an oven (in the cold season, a radiator is suitable; in the summer, if there is no oven, the material can be dried in the sun). For ease of modeling, it is better to take a baking sheet or board: besides, on the latter you can then immediately bake the finished crafts. It is also advisable to have a plastic bag at home where the dough will be stored for some time so that it does not dry out. An excellent replacement would be a container with a lid. What else you might need:
- Spoons, glasses to measure the amount of ingredients.
- Special spatulas for modeling.
- Brushes if painting will be done.
- Gouache, acrylic, other paints.
Test options and features of working with it
Every needlewoman who has been making puff pastry for a long time has her own secrets for creating this material. Some have learned experimentally to check the ideal ratio of all components, while others supplement the classic recipe with interesting ingredients that increase the plasticity of the base for modeling. Below you can learn several ways to create salt dough, see step-by-step photos of its preparation, and learn important secrets that help make the material perfect.
Classic recipe for beginners
This classic recipe will help beginners create salt dough with a minimum of ingredients. All you need to make the mass is fine salt (extra), wheat flour and water. The material prepared according to this recipe retains its properties for up to two weeks when stored in the refrigerator. Over time, you will learn to determine the required amount of ingredients by eye.

How to do:
- Pour salt (half a glass) into a wide bowl. Next, pour in water at room temperature - it should be a little less than half a glass. Stir the liquid thoroughly for five minutes, then let the solution sit for a quarter of an hour. Some grains will remain at the bottom, but this is normal, then they will disperse in the dough.
- Carefully add half a glass of wheat flour, kneading it well with a fork or spoon. Try to “break up” the resulting lumps to make kneading easier. You should get a homogeneous mass.
- If after cooking the dough sticks to your hands or looks runny, you need to add more flour. Check the readiness of the material by leaving a mark in the mixture with your fingers. If it doesn’t “float” and holds its shape, everything is ready.
- You can start sculpting immediately after cooking.
Chouxed salty dough
Choux salted dough is more delicate in texture; it differs from the classic version in that it is less dense. Unlike the result of the previous recipe, this material will be more viscous. Children are delighted with it, because the choux pastry does not stick to their hands. You can use plasticine molds as modeling tools. What ingredients will you need:
- Two glasses of water.
- A tablespoon of vegetable oil.
- Two glasses of flour.
- One glass of salt.
- A tablespoon of citric acid.

How to cook:
- Heat water in a saucepan, do not bring to a boil. Add vegetable oil.
- Place remaining ingredients in a bowl. Mix well. Then pour hot water into it. You can start kneading the mass with a fork or using a mixer.
- The mixture will be liquid at first, continue kneading without stopping. In hot water, the flour will brew and become denser.
- Knead until the material becomes thick and viscous. You can add dyes and glitter while the mixture is still hot. Ready!
How to knead the dough correctly

All ingredients of the classic recipe (flour, salt, water) should be kneaded with a fork, spoon, mixer or hands. You need to do this for a long time until the lumps are completely broken. If the salt dough is too liquid, add wheat flour to the mixture. Please note that when kneading, the mass should not crumble or fall apart. To prevent this from happening, knead the mixture thoroughly until you get a stiff dough.
How to make colored dough for crafts
Children involved in making crafts will appreciate the colored material. You can paint the products after drying them, or add coloring agents to the ingredients so that the finished modeling mass turns out to be a certain shade. Food dyes are suitable - powder, liquid, tablets. The tablets must be crushed before preparation. Required ingredients:
- Three hundred grams of white flour and fine salt.
- Two hundred milliliters of water.
- Two tablespoons of vegetable oil.

How to do:
- Mix flour, salt, water, knead into a stiff, thick dough that will not stick to your hands.
- Divide the mass into parts: there should be as many of them as you want to get flowers.
- Take a piece of finished material and make a depression with your fingertip. Pour water there on the tip of a teaspoon. Place powder or liquid dye on top - it should dissolve and be absorbed.
- Start kneading the dough again until the mixture is completely colored. If it dries out a little, add a little vegetable oil.
- Repeat the same procedure with the remaining pieces.
- Place in a bag and leave in the refrigerator until the next day. Ready!
How to color dough for children
Coloring finished products is another pleasant moment that adults and children enjoy. If we talk about paints, then regular gouache or acrylic is best. You can also use gold or silver paint. To make the item durable, coat the painted craft with varnish. You can also decorate the product with beads, sequins, rhinestones, beads, taking into account the preferences of the kids.
How and how long to dry the dough in the oven
After modeling comes the next important stage in creating crafts - they need to be dried. You can use an oven for this. At room temperature, one millimeter of material dries per day. You should not dry molded items in the microwave - they may crack and lose their pleasant appearance. Oven drying is better than other methods. A few rules for drying finished products:

- The approximate time for spending crafts in an electric oven at temperatures of 75 and 100 degrees is one hour, at 120 - half an hour, at 150 - half an hour. In a gas oven, drying will take approximately twice as long.
- Pay attention to the size: if the item has overall dimensions, the longer it will take. Monitor the temperature by opening the door slightly.
- Turn the product over periodically.
- If you decorated the item with decorative materials, such as rhinestones or beads, you cannot set the temperature above one hundred and twenty degrees.
- Place food foil on a baking sheet: then the crafts will not stick.
What can be made from salt dough
Many interesting things can be made from salt dough. This could be jewelry - intricate earrings, beautiful pendants, beads for bracelets. The material is perfect for creating children's toys - animal figurines, fairy-tale characters, and various objects. Experienced needlewomen are able to make real works of art using such dough: beautiful paintings and panels are very popular. Read below for some more ideas for creating different things.
Prints and casts of arms and legs

During the first months and years of life, a small child grows rapidly. At this time, young couples want to capture the baby in order to remember him forever at this age. Almost every family now has a camera, so needlewomen come up with other original ways to do this. For example, parents can leave their baby's hand or foot prints on the salt dough. When the child grows up, he will be interested to see this.
Paintings and panels

Three-dimensional paintings made using salt dough look amazingly beautiful. Such things will become a wonderful interior decoration and will amaze the guests who see them. In addition, a hand-made panel can serve as a wonderful gift for any celebration - birthday, wedding. Unusual paintings will delight the recipient of the gift for a long time.
Figurines and flowers

Creating figures and sculpting plants is calming and brings real pleasure. A needlewoman can make things using salt dough on her own or together with her children. Having once tried to make such figures, the kids will get carried away with this activity with pleasure. It will be even more interesting to then paint the resulting products from an unusual material.
Video
It can be difficult for beginners to make good salt dough right away, especially following tutorials with photos. It is much easier to understand the cooking principle by watching the corresponding video. The presenter of the next video prepares material for modeling using simple ingredients: vegetable sunflower oil, salt, flour, water, food coloring for coloring. Most of the components for salt dough can be found in every needlewoman’s home. Watch a video that will help you easily create plastic, good colored material for modeling:
We invite you to immerse yourself in the world of art without leaving your apartment! To make it easier for you to learn a new activity, we have prepared useful tips and master classes.
- 1 Features of working with salt dough
- 1.1 How to prepare play dough
- 1.2 Tools necessary for creativity
- 1.3 Basic drying methods
- 1.5 Why varnishing is needed
- 1.6 Possible problems and their solutions
- 2 Crafts made from salt dough
- 2.3 Symbolic mukosol figures
- 3 Useful tips
Features of working with salt dough
The origins of this type of creativity are deeply rooted in the history of our culture. The same Kolobok is an excellent artistic example of a product made from salt dough.
Anyone can work with the dough. Surely you have a handful of flour at home! In addition, the dough is much more plastic than gypsum and more durable than plasticine.
How to prepare play dough
If you have finally decided to master the process of making crafts, then it would be useful to learn how to make salt dough. We offer several recipe options from which you can choose any one you like.
- 1 tbsp. fine salt;
- 1 tbsp. flour;
- 5 tbsp. l. sunflower oil;
- water;
- colored gouache or natural juice.
Thoroughly stir the dry ingredients in a deep container, pour in the oil and a little water. To give the dough a certain color, gently stir in juice (for example, carrot or beetroot).
- 1.5 tbsp. flour;
- 1 tbsp. salt;
- 125 ml water.
Mix everything and knead the dough like dumplings. To sculpt thin relief figures, add one more thing to choose from: 1 tbsp. l. PVA glue, 1 tbsp. l. starch or a mixture of wallpaper glue and water.

- 2 tbsp. wheat flour;
- 1 tbsp. salt;
- 125 ml water;
- 1 tbsp. l. hand cream (vegetable oil).
Combine all ingredients and knead thoroughly until smooth. You can use a blender or mixer to speed up the process. The dough turns out very soft and pliable.
- 1 tbsp. flour;
- 1 tbsp. finely ground salts;
- 125 ml water.
This is a recipe for salt dough for sculpting large products. First of all, combine the salt with the flour, and then add water little by little, kneading until an elastic mass is obtained.
- 1.5 tbsp. flour;
- 1 tbsp. salt;
- 4 tbsp. l. glycerin (sold at the pharmacy);
- 2 tbsp. l. wallpaper glue + 125-150 ml of water.
This dough is well suited for making delicate works. We recommend using a mixer for mixing - it makes the task much easier.
Tools you need for creativity
In addition to the fact that you need to learn how to make salted dough for modeling, it is also important to prepare the necessary tools and a set of accessories:

All this will be useful to you for creative work with the dough.
Basic drying methods
When the product is ready, it must be properly dried. There are several methods. Let's look at the most popular of them.
Method 1 - In the oven (preheated)
Drying in a slightly open oven at a temperature of 55-80 °C (the craft is placed in a preheated oven). Place the product on a baking sheet lined with parchment paper or in a heat-resistant bowl. The process may take about an hour or longer depending on the size of the figurine.
Method 2 - Natural conditions
This means drying in the open air (but not in direct sunlight). This method takes longer than the first, but is more effective. It is best to place the product on a wooden or plastic surface. Air drying takes about 3-4 days. But we do not recommend drying it on a radiator - this can lead to the craft cracking and crumbling.
Method 3 - In the oven (cold)
According to this method, crafts made from salt dough must be placed in a cold oven and only then turned on, eventually heating up to 150 °C. The products should cool there while the oven cools down.
Figures made from unpainted dough are attractive in themselves. However, after drying, they can be decorated with gouache, watercolor or acrylic paints. They are good because they dry quickly, do not smudge and do not leave marks on your hands.

Coloring methods:
- Mix watercolor paints with water with a brush and apply to the product so that they do not spread.
- Mix gouache with PVA glue and evenly cover the craft with this mixture.
- You can give the dough a certain color while kneading. Divide it into parts - there should be as many of them as the shades you need to paint. Roll them into balls, make a hole in the middle of each and drop a couple of drops of food coloring diluted in water there. After this, knead the dough so that it colors evenly.
Modeling from salt dough also allows you to use various elements for decoration. These can be cereals, pasta, buttons, shells, beads, all kinds of threads and ribbons. The scope for imagination is unlimited!
Why is varnishing needed?
Finished products are varnished so that the paint does not fade or wash off, and the appearance of the work does not deteriorate over time. Varnishing is used if necessary and solely at the request of the author.
You can add shine to the product with varnish:
- liquid - you need to cover the product with it in several layers, the result is ruddy and natural;
- thick - it better protects the craft from moisture; you can use either a varnish that imparts a mirror shine or a matte one.
It is preferable to use aerosol varnish. A single application is enough for the colors to sparkle brighter and the work to become protected from damage.
Although, practice shows that proper drying allows you to not even resort to varnishing - the product will retain its original appearance for many years.
Possible problems and their solutions
Here is a list of problems that may arise when drying or decorating a toy made from salt dough:
- The dough has bubbles or cracks after drying. This may be caused by the wrong choice of flour or failure to follow drying rules. The simplest and most inexpensive flour for modeling is suitable - low-grade rye or wheat. And the product should be dried without undue haste in a slightly preheated oven with the door ajar. In general, it is better if the craft dries naturally.
- The product is cracked after painting. This can happen if you start painting a craft that has not yet dried enough. Let it dry in the fresh air, smooth out any rough edges with sandpaper and repaint.
- The product is cracked due to its large thickness. In this case, you need to remove excess dough from the back or bottom. In order for a large product to dry evenly in the oven, it must be turned over periodically.
- An element has broken off. You can try gluing it with PVA glue, but it’s better to just smooth out the unevenness and decorate it with some kind of decoration.
- The craft has faded after painting. An additional coating of varnish can restore the color to its former richness and make the craft brighter.
Crafts made from salt dough
According to some assumptions, the first dough moldings were used by cooks to decorate baked goods. Today, you can sculpt anything from such a wonderful material: paintings, souvenir figurines, and toys.
So, when you already know how to make salt dough, let's start creating crafts from it.

Want something interesting?
You will need:
- fine table salt;
- Wheat flour;
- cold water;
- foil;
- brush;
- whitewash;
- gouache;
- black marker.
Step-by-step sequence of actions:
- Combine flour and fine salt in equal proportions, add a little water.
- Knead the elastic dough and send it to cool in the refrigerator for two hours.
- After this time, you can begin sculpting. Make 4 balls from salt dough. These will be the sheep's feet. Place them as shown in the picture.
- Roll up a piece of foil and place it in the dough ball. Then you need to roll a ball out of the flatbread - this is the body of the sheep, it needs to be laid on top of the paws.
- Now use pieces of dough to form a head, curled horns, ears and eyes.
- To get something like curly sheep's wool, roll a lot of small balls and place them evenly on the back of our animal.
- The workpiece is ready. All that remains is to place it in the oven, preheated to the minimum temperature. The sheep should dry thoroughly without cracking. At a temperature of 50 °C it will take about 3 hours to dry and up to half an hour to cool.
- Then cover the entire surface of the figure with white. Wait until they are completely dry.
- Color the sheep with gouache. And using a permanent marker you can draw eyelashes, a mouth, outline horns and other details as desired.
- Finally, varnish the lamb. The varnish will add shine and smoothness, giving the craft a finished look.
Testoplasty allows you to create not only small voluminous souvenirs, but also entire paintings from salt dough. Of course, creating them will require some skills, patience and perseverance. However, the result can exceed all expectations, becoming a wonderful gift for loved ones or decorating the interior of your home.

We act in stages:
- Creating a painting, like any other dough craft, begins with preparing the dough itself. There are many different variations of recipes, but the most popular is this: 1 tbsp. finely ground salt, 2 tbsp. flour, 200 ml water. Knead elastic salted dough for crafts, pack it in a plastic bag and put it in the refrigerator for a couple of hours.
- Take out the finished material and you can start creating by pinching off a piece of dough from the bag (it crusts quite quickly in the air).
- To connect parts together, use water rather than glue.
- It is most convenient to create a picture on foil. It is necessary to dry the result: in the oven or in the air.
- When the craft is dry, paint it with gouache and cover it with two layers of varnish.
- Finally, attach the picture to canvas or any other fabric in the frame.
All kinds of cats, birds, snowmen, bears, dachshunds, flowers and much more look very beautiful. You can create paintings based on the plot of a particular fairy tale - this will be especially interesting for children. You can see some examples of work for inspiration in the pictures.
Symbolic mucous figurines
Salt dough is a great alternative to clay. And crafts made from it can become a unique decoration for your home or an original idea for a gift. It has long been believed that flour in the house is a symbol of prosperity and family well-being.

Regardless of what kind of figures you plan to make, the dough for them can be prepared according to one of the above recipes.


Here are some more examples of mukosolek designs that are easy to make and look amazing!
- Each recipe for salted dough for crafts involves using exclusively wheat or rye flour (but definitely not pancake flour) and finely ground salt (not iodized, since the dough will not be homogeneous, but with large inclusions).
- The mixing water should be very cold. Add it in portions, carefully kneading the dough. Depending on the flour you choose, different amounts of water may be required.
- The dough should not stick to your hands or crumble. If it doesn't stick well, add a little water, and if it sticks, add a little flour.
- Salt dough is perfectly stored in the refrigerator in a plastic bag or in a container with a tight-fitting lid. Use it piece by piece as needed, because the finished dough in the air quickly becomes covered with a dry crust, which spoils the appearance of the products. The test shelf life is 1 week.
- Crafts made from small elements look more elegant. To ensure that the parts adhere well to each other, moisten the joints with water using a brush.
- To tint the dough itself, add a little food coloring diluted in water (for Easter eggs). You can create new shades from dough of different colors: to do this, simply knead the multi-colored pieces with your fingers.
Testoplasty is not just children's fun, but also a correctional activity that allows you to develop fine motor skills of the hands, perseverance and imagination of children, cultivating aesthetic taste. And for adults, this is a great way to express themselves and recuperate. We wish you inspiration, and let creativity be only a joy!

